

How to save Monosnap screenshots to Koofr with WebDAV
Have you downloaded the Monosnap screen capture tool and are now wondering how to use it with your favourite cloud storage? Read our tutorial and use Monosnap with WebDAV protocol. Effortlessly save your screenshots and screen recordings to Koofr while annotating them on the go.
[Updated, Jun 2020: New screenshots of the Monosnap WebDAV settings]
Screenshot tools let you capture the contents of your screen, obviously. They are useful and helpful in many ways and most of us use them daily, if not for other things to send a meme or two to our friends. While there are many different screenshotting options available, today we want to show you the Monosnap tool that you can use together with Koofr with the WebDAV protocol.

1. What is Monosnap?
Monosnap is a screenshot tool for macOS and Windows, also offering an extension you can add to your Google Chrome browser.
The extension lets you capture and edit screenshots, upload files, record videos of your screen and create .gif files. You can highlight and annotate your screenshots and blur the personal and private information with the useful blur tool.

But, the desktop version of Monosnap is the one you can connect to your Koofr account with the help of WebDAV protocol. It allows users to create screenshots and record videos, annotate them and upload them to the cloud.
You can use one of two modes. The first one captures the whole screen (or screens), while the second one grabs an area of the screen you select. After taking a screenshot Monosnap opens its Editor where you can simply edit your print screen.
2. How to upload your Monosnap screenshots to Koofr?
The answer is, with the help of the WebDAV protocol, of course. As we have mentioned in our previous blog posts - Koofr supports the WebDAV protocol. If you want to instantly upload your Monosnap screenshots to your Koofr account, we are happily presenting you with an option to do just that.
Note: The instructions in this blog post were tested on the Windows version of Monosnap.
3. How to connect Monosnap to Koofr with WebDAV?
(1) You need to create a free Koofr account
(2) Download, install and open Monosnap on your computer
Note: While we were only able to test the Monosnap's WebDAV connection to Koofr with a free Monosnap account, there is a premium version of Monosnap. You will need it if you want to actually transfer your files to Koofr with the WebDAV connection.
(3) Log in to your Koofr account and create an application-specific password to use with Monosnap. Check out our video to see how you can do that.
(4) Open Monosnap’s Settings on your computer. Type in your Koofr user name (the email you used to create your Koofr account) into the User field. Type the password you generated in your Koofr account into the Password field. Other settings should be typed-in exactly as in the picture below, where you can see the settings for the WebDAV connection to Koofr in Monosnap.
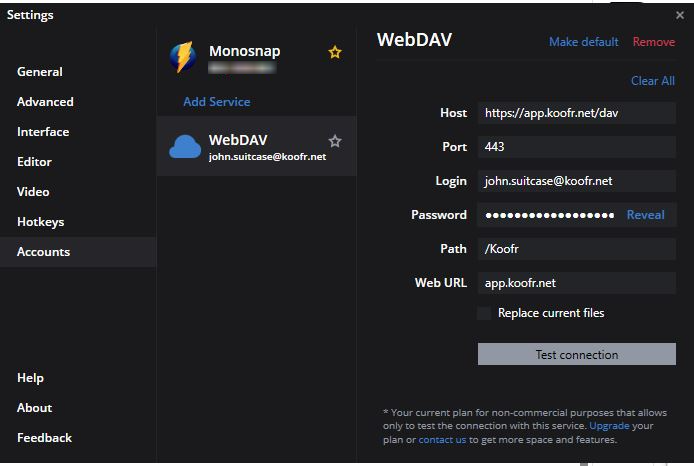
If you are in your free Monosnap account, click on Test connection and you will get Connection test succeeded message.
Note: If you are not using the paid version of Monosnap, you can create a folder on your computer, save the screenshots in it and use Koofr's sync feature to transfer the Monosnap screenshots to Koofr.
Happy screenshotting!
Want to talk to us? Join us on the Koofr subreddit and let us know how you use Koofr with WebDAV.